9 Jan 2024
How to increase speed of indexing pages in Google
Indexing your site’s pages in Google is a mystery wrapped in an enigma for many pros out there. From newbies to seniors — no one really knows when exactly that one particular page is going to be indexed and checked.
Of course, a lot depends on the domain authority, age, history (and “prehistory”), how much money’s been thrown into it before, etc. But if you, like me, are an SEO Team Leader for a media outlet in the betting and casino niche, indexing speed is your critical need. I mean, no one’s gonna care about football betting tips you posted two months ago… today.
In this article, I’ll walk you through a personal case study of how I set up faster indexing for my team — before implementing this method, our average indexing time was 2.5 months. After? 27 hours from the moment the page goes live.
And the best part? It’s free and doesn’t even require registration. I’ll show you how I did it using 100% free, publicly available tools. Let’s go!
Page indexing in Google — what is it, really?
Let’s start from scratch. Simply put, page indexing is when your page is actually in Google. Meaning, it shows up in search results (whether it’s on page 5 or 100 is another story — the point is, it’s there!).
A bit less simple, but still on point, ChatGPT defines it like this:
“Page indexing in Google is the process of adding a web page to the search engine’s database so it can appear in search results.”
Here’s how it works:
- Crawling — Googlebot visits your page, checks out its content and links.
- Processing — Google evaluates whether the page meets its standards (content quality, mobile-friendliness, load speed, etc.).
- Indexing — if it checks out, the page gets saved to Google’s index.
- Ranking — when users search, Google evaluates how relevant your page is and ranks it accordingly.
For any webmaster, SEO specialist, site manager, etc., indexing is step one. Without it, there’s no traffic, no user signals, no money — nada.
How long does it take to index a page in Google?
Like I mentioned above — it depends. The key factors usually boil down to:
Internal factors (site-related)
- Content quality (classic): unique, helpful, structured content gets indexed faster.
- Site’s technical health (everyone’s fave): broken links, bad redirects, messy code — indexing slowdown guaranteed.
- robots.txt file (Captain Obvious moment): if it blocks access to your page, Googlebot won’t index it. Shocker, I know.
- sitemap.xml (debatable): a sitemap can help Google discover new pages faster.
- Internal links (no-brainer): if your other pages link to it, Google finds it faster.
- Page speed (chasing the unicorn): slow sites take longer to crawl. Sometimes Googlebot just gives up.
External factors (beyond your site)
- Backlinks: if authoritative sites link to your page, it gets Google’s attention quicker. On big sites, though, new pages often get left behind. Sad but true.
- Social media activity: even though Google says they don’t count social signals — links from social platforms do help. Proven and tested, especially in the international (non-Russian) market.
- Content update frequency: frequently updated sites get crawled more often. It depends on many “ifs,” but more updates = better odds.
So, if you line all these (plus a few more) ducks in a row, you’ll get fast indexing. That means Google will pick up each new page on your site super quickly. Ah, the dream!
As I mentioned, I’m organizing workflows and a team game plan for a young media project. Most of our content is sports betting advice. Here’s an example to illustrate my pain:
- Saturday: Man United vs. Liverpool in the Champions League (any resemblance to real teams is purely coincidental 😉);
- You publish your predictions on Monday — 4 days before the big match. Everything’s ready: odds, insights, explanations, the works.
Sounds like a traffic goldmine, right? 💸
But nooope… You check Search Console and:
- You’ve got 500 pages crawled but not indexed (this article’s not about why that happens — don’t throw your SEO flip-flops at me, I know indexing isn’t always the root cause. Thanks.).
- Your console doesn’t just miss that URL — it misses everything your content team fought so hard to deliver all week! (And that’s if you’re lucky enough to have a week. I had a default lag of 2.5 months).
- Manual site: check? Nada. Just like Console said.
Now I think you feel my pain. So let’s get to the good stuff — the step-by-step of how I got Google to index my pages quickly, within 24 hours, and almost on autopilot.
How to index pages fast: step-by-step guide
The idea revolves around using 4 free tools:
- Google Sheets;
- Google Search Console;
- Google Cloud (to access the Google API);
- Apps Script (embedded in your Google Sheet from step 1).
Step 1: Get the Google API
Google API is a set of classes, procedures, functions, structures, and constants provided by Google services for use in external software products.
- Open the Google Cloud Console.
- Create a new project:
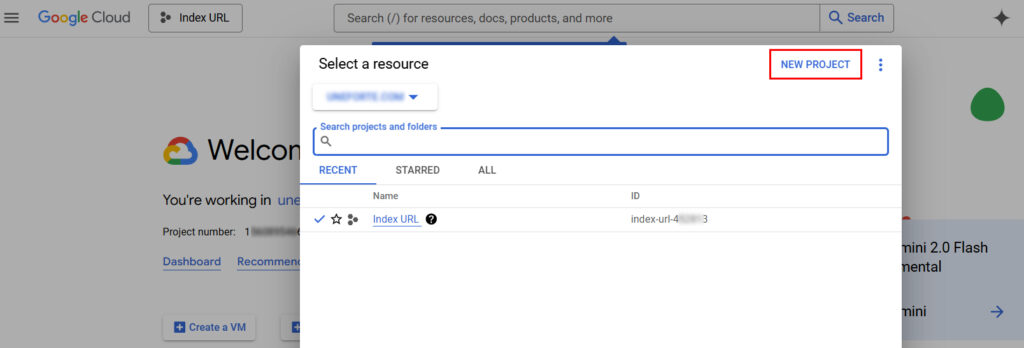
3. Next, go to “APIs & Services” → “Credentials”.
4. Click “Create Credentials” → “Service Account”.
5. Give it a name, for example, IndexingBot, and click “Create”.
6. In the “Roles” section, select “Owner”, then click “Continue”.
7. In the final step, click “Done”.

8. In the “Credentials” section, find the service account you just created.
9. Go to the “Keys” tab, click “Add Key” → “Create New Key”.
10. Choose JSON, download and save this file (it will be needed for the script in the following steps).
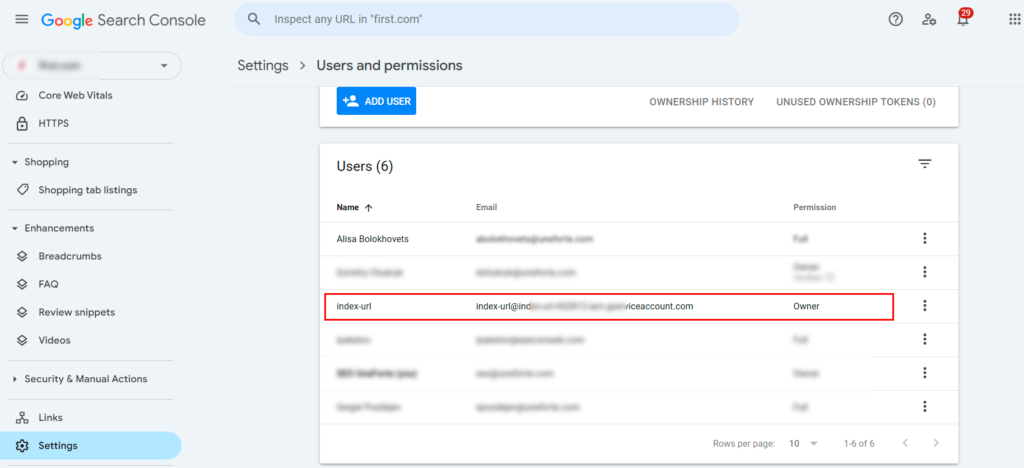
Step 2: Connect the service account to Google Search Console
1. Open Google Search Console.
2. Select the site you want to manage indexing for.
3. Go to “Settings” → “Users and permissions”.
4. Click “Add user”, and enter the email address of the service account (you can find it in the JSON file, e.g., your-bot@your-project.iam.gserviceaccount.com).
5. Grant Full permissions (Owner) and click “Add”.
Step 3: Create a Google Sheet
- Create a new Google Sheet in Google Sheets.
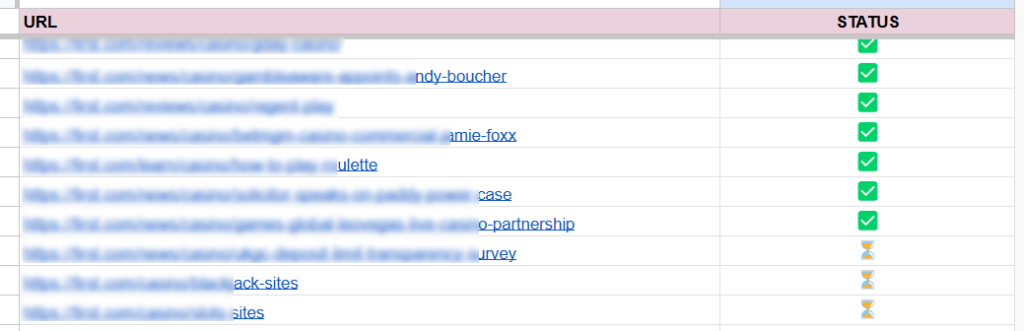
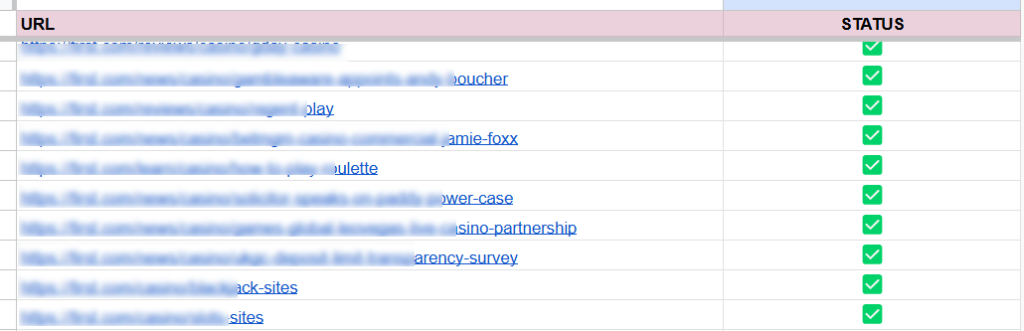
- In Column A, you’ll enter the new URLs of pages that need to be sent for indexing.
- In Column B, you’ll track the indexing status (⏳, ✅).
- Copy the Sheet ID (it’s located in the URL between /d/ and /edit).
Step 4: Set up Google Apps Script
1. In your Google Sheet, click on “Extensions” → “Apps Script”.
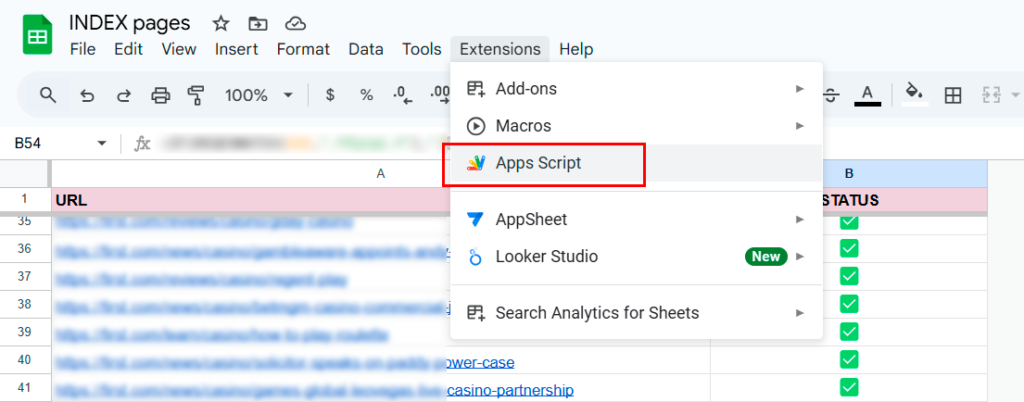
2. Delete all existing code and replace it with the following:
/**
* Trigger: Runs automatically when a user edits the sheet.
* If column A (URL column) is edited → add "⏳" status to column B.
*/
function onEdit(e) {
var sheet = e.source.getActiveSheet();
var editedRow = e.range.getRow();
var editedCol = e.range.getColumn();

// Process only edits in column A (URLs), excluding the header row
if (editedCol === 1 && editedRow > 1) {
var urlCell = sheet.getRange(editedRow, 1);
var statusCell = sheet.getRange(editedRow, 2);

// If URL exists and status is empty → set to "⏳"
if (urlCell.getValue() && !statusCell.getValue()) {
statusCell.setValue("⏳");
}
}
}

/**
* Main function:
* Loops through all rows and sends URLs with status "⏳" to Google Indexing API.
* Updates status to:
* "✅" — success
* "❌ Error" — failed
*/
function indexNewUrls() {
var sheet = SpreadsheetApp.openById("ВАШ_ID_ТАБЛИЦЫ").getActiveSheet();
var data = sheet.getDataRange().getValues();
var token = getAccessToken();

// Start from row 2 (index 1), skip header row
for (var i = 1; i < data.length; i++) {
var url = data[i][0]; // Column A
var status = data[i][1]; // Column B

if (url && status === "⏳") {
var success = sendToIndexingApi(url, token);

if (success) {
sheet.getRange(i + 1, 2).setValue("✅");
} else {
sheet.getRange(i + 1, 2).setValue("❌ Error");
}
}
}
}

/**
* Sends a single URL to the Google Indexing API.
*
* @param {string} url - URL to index
* @param {string} token - OAuth access token
* @returns {boolean} - true if API responded 200 OK
*/
function sendToIndexingApi(url, token) {
var options = {
method: "post",
contentType: "application/json",
headers: {
Authorization: "Bearer " + token
},
payload: JSON.stringify({
url: url,
type: "URL_UPDATED"
})
};

var response = UrlFetchApp.fetch(
"https://indexing.googleapis.com/v3/urlNotifications:publish",
options
);

return response.getResponseCode() === 200;
}

/**
* Generates an OAuth access token using a service account.
* Requires the SERVICE_ACCOUNT_JSON to be stored in Script Properties.
*
* @returns {string} - access token for Google Indexing API
*/
function getAccessToken() {
var serviceAccount = JSON.parse(
PropertiesService.getScriptProperties().getProperty("SERVICE_ACCOUNT_JSON")
);

var tokenUrl = "https://oauth2.googleapis.com/token";

// JWT header
var header = {
alg: "RS256",
typ: "JWT"
};

// JWT claim set
var claimSet = {
iss: serviceAccount.client_email,
scope: "https://www.googleapis.com/auth/indexing",
aud: tokenUrl,
exp: Math.floor(Date.now() / 1000) + 3600,
iat: Math.floor(Date.now() / 1000)
};

// Encode header + payload
var jwt =
Utilities.base64EncodeWebSafe(JSON.stringify(header)) +
"." +
Utilities.base64EncodeWebSafe(JSON.stringify(claimSet));

// Sign the JWT
var signature = Utilities.computeRsaSha256Signature(jwt, serviceAccount.private_key);
var signedJwt = jwt + "." + Utilities.base64EncodeWebSafe(signature);

// Exchange JWT for access token
var response = UrlFetchApp.fetch(tokenUrl, {
method: "post",
payload: {
grant_type: "urn:ietf:params:oauth:grant-type:jwt-bearer",
assertion: signedJwt
}
});

var json = JSON.parse(response.getContentText());
return json.access_token;
}
Step 5: Configure and Run
1. Open Apps Script → Project → Project Properties.
2. Add a new entry named SERVICE_ACCOUNT_JSON and paste the contents of the previously downloaded JSON file there.
3. Save the changes.
4. Then, go to Triggers, and add a trigger for the indexNewUrls function to run every 15 minutes (or 30, 40… however you like!).
Voilà! That’s it.
As you can see, this setup takes no more than 10 minutes, and the result will make you happy: it’s fast, efficient, and nearly automatic.
Give it a try! And don’t forget to leave a comment letting us know what you think of this solution.